30 Mayıs 2012 Çarşamba

I Wanted to Share a Fun Blog Hop With You...

To contact us Click HERE
Plum and June

Hi everyone...Beth from the blog Plum and June emailed me with a link to a Blog Hop she's having. It's such a wonderful idea, I wanted to share it with you.

The Blog Hop participants are NEW bloggers who starting blogging in 2011-2012 with a primary focus on quilting!! Each day, the participants, who are assigned a special day, will post a wonderful project.

The best part is each day we can "hop" over for a visit and enjoy all these great tutorials. The hop started May 22nd and the tutorials so far are amazing!! The schedule is booked into October, so it looks like a fun hop into Autumn too.

If you are a new blogger, love to quilt and want to participate contact Beth or Click HERE to a link for more info. Scroll down a bit for the Hop Details.

If you've been blogging for a while and just need some fabulous inspiration, bookmark the Blog Hop or "Follow" along by clicking here to visit Plum and June.

As a side note...

The ideas are turning in my head again. To think...there are Blog Hops and Give Aways out there in blogland that aren't getting the attention they need has me thinking.

I am going to add another linking party on the SAME post as Find a Friend Friday. Each Friday, I will have 2 parties...one for sharing your blog to find new friends and the second to spread the word about Blog Hops and Give Aways. If you're having a give away or blog hop, YOU can easy link up at the party to share the fun! That way, we can have all that great information all in ONE place.

Look for it this Friday if you have a give away or blog hop you want to share with everyone!!

Thanks for stopping by here and "HOP" over to Beth's...you won't be disappointed.

Have a great day,
~Karen~

Pin It

How to Make Fondant Butterflies

To contact us Click HERE


I've recently shared two cakes that were embellished with fondant butterflies, my daughter's Butterfly Birthday Cake (above, right) and most recently the Purple Ombre Mini Cakes (above, left).  As promised, I've prepared a tutorial for making these easy and beautiful fondant accents.   
~ How To Make Fondant Butterflies  ~

1.  Color your fondant as desired, and roll out to about 1/8 inch thick. 
Note ~ If you are new to working with fondant, I have a full post, Fondant 101 that shows how to color and roll out fondant, and lots of different ways to use fondant.

2.-3.   Use an impression mat of some kind to press a pattern onto the fondant.  I used an Embossing Folder by Cuttlebug, which is really a scrapbooking tool, sold at craft stores with paper crafting items. 


4.-5.   Use a butterfly cutter (this one can be bought at Global Sugar Art or similar cutters from Country Kitchen SweetArt) to cut the fondant. 

6.  Carefully lay the butterfly shapes in a "valley" created by folding a piece of sturdy cardstock into a V shape (as shown).  This will allow the butterflies to dry with their wings "in flight".  Of course if you'd like the wings flat, simply dry on a flat surface.  To prevent the butterflies from sticking to the paper, use paper with some texture on it, and/or dust the paper slightly with corn starch or powdered sugar (before laying butterflies on it).  Allow fondant butterflies to dry 12-24 hours (or more) before adding to cakes or cupcakes.   


Add your fondant butterflies to cakes, cupcakes or any special treat.  The cakes above show the butterflies in two sizes, small on the Butterfly Birthday Cake on the left, and large on the Purple Ombre Mini Cake on the right (sources for the cutters linked above).
Happy Decorating!

Sewing and Quilt Cookies

To contact us Click HERE


Sewing has been a part of my life almost as long as I can remember.  Growing up, my bedroom was right at the top of the stairs in our house, and my mom had a sewing room/closet directly at the bottom of the stairs.  To me, one of the sounds of the Christmas season was hearing my mom sewing late into the night.  Most every year she would make each of us (myself and my two sisters) something that she had sewn as a gift... a quilt, a stuffed animal, or a dress.  Still today, my mom continues to enjoy sewing and quilting and makes lots of beautiful things as gifts and for her (and my Dads') home. 
My sister's and I each learned the basics of sewing from my mom, and at different times in our lives we've enjoyed dabbling with sewing projects.  When I was preparing for my wedding (at the ripe old age of 19), I signed up for a sewing class in college and made my own wedding dress as my class project.
My daughter Grace, now 8, has taken quite an interest in sewing, and although I could teach her myself, I knew she would enjoy taking some sewing classes from a "real" teacher.  She's been taking classes at our local quilting store and loves showing off the tote bag and skirt that she's made so far. 
I've been wanting to make some sewing and quilt cookies for a while, and when I realized that a  (sewing loving) friend's birthday was coming up, I thought I could make fun cookies for my friend, as well as some for Grace's sewing teacher.
Here's the collection I came up with...   

I had a fun time creating several different quilt-inspired designs...


Want to make some sewing and quilting cookies too?  Let's get started! I started with my go-to Sugar Cookie Recipe and Royal Icing Recipe (the post with the royal icing recipe also includes lots of cookie decorating basics, if you are new to cookie decorating). 

Because each of the cookie designs in this set required some drying time between steps, I began with the first steps on each design, then moved on to another cookie shape/design.   By the time I had done one portion of each cookie, it was time to move to the next layer of design.  As you can see above, I did the first color on some of the quilts, then I move to some buttons (using a great tutorial from Sweet Sugar Belle), then I started on the spools of thread.   

~ How to Make Quilt Cookies ~
1.  Decide on your pattern, and use a light colored edible marker (and a ruler) to mark your desired design.2.  Begin your pattern, using a piping/outline consistency icing to outline the areas for your first color.3.  Fill in the outlined areas (with a medium/flood consistency).  Allow this color to set/dry (1-2 hours) before adding the next color, in the remaining space. 

~ How to Make 'Spools of Thread' Cookies ~
These cute and simple cookies were inspired by Sweet Sugar Belle.  I used a mini dog bone shaped cookie cutter, and stretched it open just a bit.  Using a medium consistency brown icing, pipe the top and bottom of the "spool" (as shown in an above photo).  Allow the brown "spool" area to set/dry (1-2 hours) before adding the "thread" color.  Fill in with the "thread" color, in this case blue or green.  Allow that section to set (1-2 hours) before adding the final detailing, the top layer of "thread" in a thicker/piping consistency.  I also added a thin line on the "spool" with a brown edible marker to add just a bit more definition.   

My favorite cookies from this set were the two centerpiece cookies (inspired by Maryann/ Cookie Artisan's centerpiece cookies).  I outlined each cookie in two different colors (allowing a little drying time between colors) then flooded the cookie in white.  When that base was dry I used piping consistency icing and a #1 tip to pipe my messages to resemble embroidery. 
When I mentioned to my daughter (Grace) that I was making some cookies for her sewing teacher she said that I should make a cookie that looked like a sewing machine.  I didn't think I had the skills to do that in a way that would actually look like a sewing machine, but I said she could do it!  So I outlined and flooded a square cookie, allowed it to dry overnight, then let her bring her idea to life using edible markers.  I love that she was braver than I was!  And I think she did an adorable job (see her cookie below)!   P.S.  Any comments you have on her cookie I'll gladly pass along to her.  

Do you love sewing and love cookies?  Here are some great sewing and quilt cookies from cookie friends around the web...
Sweet Sugar Belle - (Button Cookies and 3-D Sewing Machine Cookies)
Bakerella - Button Cookies
The Bearfoot Baker - Sewing Cookies
Cookie Crazie- Quilt & Sewing Cookie Collection
Sugar and Meringue - Granny Square Cookies (crochet style cookie)

Happy Stitching Piping! 

Chocolate Cupcakes in a Jar

To contact us Click HERE


Recently, I've been dreaming up lots of delicious and creative combinations for variations on Cupcakes in a Jar.  The first ones I made last year were Chocolate with Vanilla Frosting, then I made Red, White and Blue for the 4th of July, delicious Orange Creamsicle, and then simple Halloween Cupcakes in a Jar.   But when it came down to it and I had some time to make some this week,  what did I make... chocolate!  Not super creative or original, but oh so delicious!  Sorry, but given the choice I'll always choose chocolate... and if you can add the word "double" in there (as in "double chocolate"), then I'm really all in!  So that's what I have for you today, Double Chocolate Cupcakes in a jar. 
I used my favorite Chocolate Cupcake Recipe and Chocolate Cream Cheese Frosting.Of course these could be made with any combination of box mixes, or recipes.
How to make Cupcakes in a Jar ~ 
Bake cupcakes as directed by the recipe, using paper liners.  Cool cupcakes, remove paper liners, and slice cupcakes in half (horizontally).

Prepare frosting as directed.  For easy (and pretty) assembly, fill a large piping bag with frosting (or a large ziplock bag, with the end cut off). 

Layer cupcake halves and frosting in 8 oz jars (I usually buy mine at Wal-Mart, also available on-line at The Jar Store).  Each jar will have 3 cupcake halves (or 1 1/2 cupcakes). 

Serve open, or top with the lid for travel or gift giving.  Store, covered with lids, in the refrigerator up to 3 days (maybe longer, but I can never seem to wait!).  Best when eaten at room temperature.    


In my mind, Double Chocolate Cupcakes could be considered medicinal, under certain circumstances... so feel free to save a few toward the back of your fridge to use "as needed", or share with a friend in need  =)

I'm also excited to add that my cupcakes in a jar are featured in this weeks Women's World Magazine!  Below is a peek of the magazine and the (full page!) article featuring my photos and recipe suggestions.  The issue is on stands now, and is marked as the May 28th edition.  And yes, I know that magazine covers often share quite conflicting headings.   I'm not sure these cupcakes will help you get "slim" even while drinking tea... but you could try to enjoy them while running in place! 

Happy Baking!

Vintage Bunting Baby Shower

To contact us Click HERE


I recently had the honor of hosting a baby shower for my little sister, Joy  (don't be confused... if you're a long time follower, you may realize that my youngest daughter has the same name).  
  We knew that the baby-to-be would be a boy, with the name Jeremiah already decided (to honor a recently deceased very special Grandpa).  I also knew that baby Jeremiah's room was painted a beautiful, soft blue.  Along with Joy's leading, I chose a color palate of mixed blues, along with touches of green to pull the party elements together without the typical "themed" feel.  I created a fabric bunting using fabrics in various colors, both solid colored and polka-dot to add a bit of a vintage feel.  The bunting was an element that I included in the invitations and the cookie favors as well (as you'll see below). 
Please join us for baby Jeremiah's shower...    

One of my very favorite elements of the food table was the antique blocks shared by a long time family friend (Sally), that were used to spell out sweet Jeremiah's name.  We also used more of these antique toy blocks on the little side tables and drink tables outside (where most of the party took place). 

The party menu included...Croissant sandwiches filled with delicious Chicken SaladFresh fruitSimple Caprese Salad Homemade pasta salad (not pictured)Chocolate CupcakesDecorated Sugar Cookies

 Fresh fruit served in individual treat cups (these are from Shop Sweet Lulu).
Delicious Caprese Salad, one of my favorites! (Tomatoes, fresh mozzarella, fresh basil, drizzled with olive oil and balsamic vinegar, dressed with salt and pepper)
  I often make these Chicken Salad Sandwiches for parties.  The chicken salad can be made a day or two in advance, and they are always enjoyed!
For the sweets, I made Chocolate Cupcakes with Vanilla Cream Cheese Frosting, and topped them with simple, pre-made flowers (from Sweet Estelle's Baking Supply).  I also made decorated Sugar Cookies, some to be enjoyed at the party, and others wrapped as favors. 
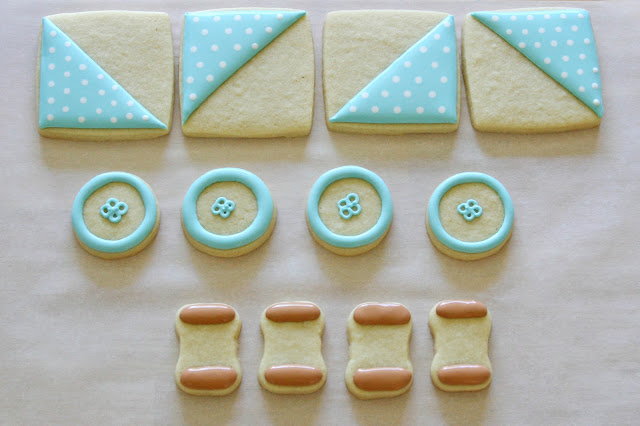
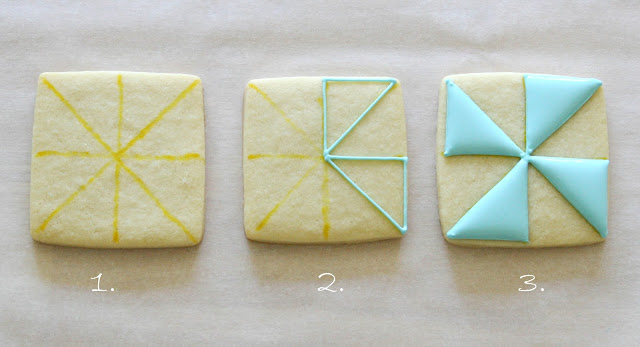
The favors were a single, special sugar cookie, decorated with a little bunting design (full tutorial soon).  I packaged the cookies as I've show HERE.  The personalized labels and the finishing paper trim on the packages were from Paper Jacks.  I displayed the cookies in vintage milk glass, and Hull Pottery.   
Here's another look at the favor cookies, which were inspired by the custom invitations by Swish Designs, and then packaged with perfect labels and paper ribbon from Paper Jacks.  Donna of Swish Designs did a great job creating a special invitation to incorporate the look of the fabric bunting.  
In the kitchen, I had a table for drinks (iced tea, lemonade and water).  I used extra fabric from the bunting I'd made to tie around mason jars, to be used as drinking jars.  I carefully calculated the number of different fabrics I had, and then used 4 different colors of straws (from Shop Sweet Lulu) and was able to have each jar have a different combo of fabric and straw color, thus identifying each glass (without name tags).

Although baby Jeremiah was due to arrive a month after the shower... apparently he'd heard about "Glorious Treats" parties and didn't want to miss it!  He arrived quite early (at 32 weeks) but was surprising healthy (thank you Jesus!) and was able to come home less than 3 weeks after delivery, and made it to his own shower! 
And what did he think of the party...   ...it was just dreamy! 
Party notes:All styling and photography by (me) Glorious Treats.
Recipes linked below (or near) the appropriate item within the post.
Invitations by Swish Designs *Use the code GLORIOUS at checkout with any Swish Designs order on Etsy for a 10% discount.
Polka-dot treat cups and paper drinking straws from Shop Sweet Lulu.
Cookie favor labels and paper ribbon from Paper Jacks.

26 Mayıs 2012 Cumartesi

Showcase Your Talent Thursday #6

To contact us Click HERE
Welcome to Showcase Your Talent Thursday!!
What's cooking, love?
Happy early Mother's Day to all of the moms!  I hope that everyone has a great rest of the week and a great Mother's Day on Sunday.  This is my first Mother's Day as a mother, so I am sure I will have a good day.  


Thanks to everyone that linked up last week! I love looking through all of your links every week.  There are so many great ideas linked up every week, so make sure that you take a look at all of them. I can't wait to see what everyone has to share this week!!


The most viewed link: 


Trouble on a Plate - Oreo Style by Back For Seconds.  These Oreos with Peanut Butter look so delicious.  I have never had Oreos with Peanut Butter before. I can't wait to try these.

Here are some of my favorites from last week:

fat-ruby-253-e1314259071171
Chocolate Peanut Butter Cup Cupcakes by Susie Homemaker. Yum! The peanut butter frosting looks so good and I love the peanut cup piece on top. 


How to Make a Fabric Bunting by The Evas of Bellabini.  This bunting is so cute! I think this is a great idea for a birthday party or any celebration. I might have to do this for Aaron's 1st birthday party.  The best part is that I don't have to sew!


No-Bake Chocolate Eclair Dessert by The Kitchen is My Playground.  This cake looks so amazing, especially the chocolate on top. The best part is that it is easy to make and does not require baking!


Skillet Potato Soup by Stringtown Home.   I love how this soup is made in a skillet. Nothing is better than an easy, good, comforting meal!

strawberry shortcake bliss 2
Strawberry Shortcake Bliss by Love and Laundry.  I wish I had some of this strawberry shortcake for dessert right now! It looks so delicious!  
Thanks for linking up and feel free to grab a button if you were featured.

What's cooking, love?Copy and Paste Code


Link up as many of your recipes, crafts, tutorials, ideas, projects, or fun posts as you would like to share.Please do not link up any etsy shops, giveaways, or advertisements.Link up to your post and not your main blog.Make sure to visit some of the other links and most of all HAVE FUN!!!

Please feel free to take a button and post it somewhere on your blog
*Alyssa*


Blog Swap with Cups by Kim

To contact us Click HERE

Tomorrow I am swapping blogs with Kim from Cups by Kim.
Kim has her own cupcake business and her blog has so many good cupcake recipes and other recipes.
We are participating in Trading Blogs hosted by Melissa at Serendipity and Spice.


At Cups by Kim I will be sharing my Cinnamon Smores Cookie Cups.  These are so delicious.  They are cookie cups made with chocolate chips, cinnamon chips, cinnamon graham crackers, and cinnamon bun marshmallows.

Please head on over to Cups by Kim tomorrow to check it out!!!

Cups by Kim

Also please make sure to stop by here tomorrow to check out Kim's Chocolate Almond Cupcakes! 

Swapping Blogs and Chocolate Almond Cupcakes

To contact us Click HERE
Today I am swapping blogs with Kim from Cups by Kim.  I am so happy to welcome Kim here. Her blog is wonderful and has so many delicious recipes, including all of her cupcakes. She even runs her own cupcake business.  Please make sure that you go check out her blog and check out my post for Cinnamon Smores Cookie Cups there.  Here's Kim and her Chocolate Almond Cupcakes:


Well hello everyone! I'm Kim, and typically you can find me over at Cups by Kim. But today! Today is the day that Alyssa and I are swapping places! Well, not really swapping places, besides I don't know anyone who would volunteer to take on my crazy life. We're swapping blogs! We signed up to be part of the


I'm so happy that Alyssa invited me over here to share one of my recipes with all of you.
After stalking checking out her blog I decided that I was going to stick to what I'm good at, but add in a twist for Alyssa. If you know her, you know that she is lacotse intolerant. Personally, I don't know how she does it. She's a much stronger woman than I!
I decided that I would use one of my most favorite items that I was heavily dependant on when I was diary free after I had my little one, Almond Milk.
Now if none of you have ever tried Almond Milk you are totally missing out.
It's a great alternative to cows milk. And it comes in so many different flavors now, you can't go wrong with Chocolate Almond Milk & A Cupcake.
I decided that's just what I would do.
Drum roll please...ddddddddddddddddddddddddd!


And not only are these cupcakes made with Almond Milk. They are Gluten Free and have a top secret ingredient.Quinoa.(okay a little side note, please excuse the digression, I have to get it out)So this thing Quinoa. I've been intrigued by this for a while now, and though I haven't been brave enough to try it, I finally decided to put on the big girl panties and cook it up. It was pretty simple to make, and was perfect for these cupcakes, and I will admit, Sophie actually enjoyed it. But I very much disliked it. Not because of the taste or anything like that, but because of the mess it makes. There are a few things that I abosolutely despise doing in the kitchen.Chopping Broccoli. I hate the little tiny pieces that get everywhere and are impossible to wipe up.Using Stainless Bowls.I have white countertops, need I say more?And now experimenting with Quinoa has been added to this ever growing list. Why you ask?Because it sticks to everything! I think Quinoa is one of NASA's Top Secret science projects that went terribly wrong in the easy remove glue department, but went terribly right in the good for you category.If you're up to it and have figured out a way to prevent this from sticking to every horizontal surface in your kitchen I would highly recommend these cupcakes.I'm not convincing you am I?Really, the flavor of these cupcakes outshines the stickiness of the Quinoa completely.Really. You need to try these.Okay so enough digression, how about the recipe.Well here you go!
Chocolate Almond CupcakesIngredients:2/3 cup white or golden quinoa
1 1/3 cup water
1/3 cup almond milk
4 large eggs
1 tsp. pure vanilla extract
3/4 cup butter, melted and cooled
1 1/2 cups sugar
1 cup cocoa powder
1 1/2 tsp. baking powder
1/2 tsp. baking soda
1/2 tsp. salt
Directions:
Bring the quinoa and water to a boil in a medium saucepan. Cover, reduce to a simmer and cook for 10 minutes. Turn off the heat and leave the covered saucepan on the burner for another 10 minutes. Fluff with a fork and allow the quinoa to cool.

Preheat the oven to 350°F. Line cupcake tins with liners and set aside.

Combine the milk, eggs and vanilla in a blender or food processor. Add 2 cups cooked quinoa and the butter and continue to blend until smooth.

Whisk together the sugar, cocoa, baking powder, baking soda and salt in a medium bowl. Add the contents of the blender and mix well. Fill the cupcake pans 2/3 full. Bake for 15-18 minutes. Remove from oven, allow to cool in pans for about 5 minutes and then remove to cooling rack. Allow cupcakes to cool completely and frost as desired.

These cupcakes are so rich and chocolatey they didn't need any frosting at all, but they looked kind of naked in the pictures, so I decided to try them with some cream cheese frosting and hazelnut spread.  TA DIE FOR!I hope all of you enjoyed this as much as I did. I want to thank Alyssa again for inviting me over for the day, and I hope that all of you will come check out my blog atCups by KimHave a fantastic week!


Showcase Your Talent Thursday #8

To contact us Click HERE
Welcome to Showcase Your Talent Thursday!!
What's cooking, love?
I hope that everyone is having a great week! I am so glad that it is a 3 day weekend coming up. We are supposed to have really nice weather for the Memorial Day weekend, so that's great! 


Thanks to everyone that linked up last week! There were so many great ideas posted!  I loved reading all of your posts!  I can't wait to see what you have to share this week!!


The most viewed link: 


Chicken Crunch Wrap by Baking with Blondie.  This is her take on a crunch wrap from Taco Ball. This looks so delicious. There is even tortilla chips inside!


Here are some of my favorites from last week:


Graham Cracker Chocolate Chip Muffins by Michelle's Tasty Creations.  These muffins look amazing! The muffin has graham cracker crumbs and chocolate chips with a topping with graham cracker crumbs, yum!


Beaded Earring Tutorial by A Rosie Sweet Home.  These earrings are so pretty.  There is a great step by step tutorial on how to make these. I will have to make a pair of my own.


Wake Up Call Cupcakes by Sarah's Kitchen.  These cupcakes look so delicious! They are chocolate espresso cupcakes with coffee buttercream icing! The icing looks so good, I could eat it by itself!


Nutter Butter Truffle Brownies by Crazy for Crust.  Yum! All three layers of this look amazing, and together, wow! Brownies with Nutter Butter Truffle on top and then chocolate ganache to top it off.


Thanks for linking up and feel free to grab a button if you were featured.

What's cooking, love?Copy and Paste Code


Link up as many of your recipes, crafts, tutorials, ideas, projects, or fun posts as you would like to share.Please do not link up any etsy shops, giveaways, or advertisements.Link up to your post and not your main blog.Make sure to visit some of the other links and most of all HAVE FUN!!!

Please feel free to take a button and post it somewhere on your blog

*Alyssa*