Thought I would share a little project that I have wanted to do for years and finally made it happen. We moved into this house over 19 years ago. When you're moving in, your goal is to just get your life organized and functional..."where" I hung my curtain rods was not high on my "to do" list, so they just went up.
Well, for years I thought the rods were hung too low. We had valances at first then these drapes. There never seemed to be a good time, money wise, to change all of them or even afford the fabric (I really wanted, $40.00 per yard) to make them, because they would need to be longer, the windows are wide and they needed to be lined!! Our 2 daughters are in college now and there still isn't extra money to go out and change the drapes. I desperately wanted to move the rods higher, so here's my solution.
I forgot to take a before picture of the curtain rods, but this is a picture of one room on the left not done and the finished room on the right, where the curtain rods is raised up where I wanted it.


Here is the after, where both rods are higher.
See the drapes in the room on the right...perfect length right?

Here's how I did it.
First measure the existing hem on your drapes. Mine is 4 inches...that's how I knew I could raise my curtain rod 4 inches higher.

Up go the rods 4 inches and a little paint job to patch that spot.

Now this is what I was left...drapes that are 4 inches too short.

Ahh, but not for long!

This is what normal store bought drapes look like.

The lining isn't attached at the bottom, so just lift it up and start picking the hem apart.
You can use a seam ripper ...

or the point of your scissors to snip the threads.

Open up the hem and you will see a narrow fold of about a half inch. This is your new hem. Not ideal, but it will do to hold me over until I can buy or make new drapes.

You also have to pick out the corner folds.
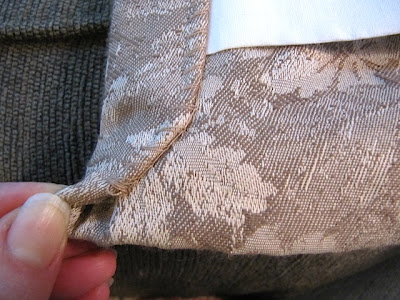

This will release the whole hem.

Done. New hem four inches lower.

I used Stitch Witchery to iron down the new hem and side seams. It is a fusible web to iron things together.

Just open seam and place a piece of the Stitch Witchery, fold fabric over and iron.

Done!!

Perfect length and no one will ever know I have a very tiny hem behind there. Lol

Having the rods higher might not look like much in the pictures, but it made a huge difference in person.

Don't be afraid of change in your home. If you don't like something, think of a way to make it happen...for me, not using money was a kick in the pants to get my brain working for a solution!
Now to paint that tv stand black and repair the holes in the walls!
Have a great day,
~Karen~


 Cut the florets in half and place them cut side down on a sheet pan that has been spritzed with olive oil (I roast veggies so often that I have a dedicated roasting pan). Spritz the top of the florets with oil and sprinkle with salt and pepper.
 Pop the pan into a preheated 425F oven for 12-15 minutes, or until the broccoli starts to caramelize.
 Mmmmmm. Look at all that toasty goodness.
 Pile them up on a platter and watch them disappear.

 Roll cookie dough between 2 sheets of wax paper. I find a ball-bearing rolling pin does the job best. To ensure all the cookies turn out the same thickness and bake in the same amount of time, use 1/8-inch wooden dowels as a guide when rolling the dough.
 Cut your cookies with your favorite cookie cutters. I love my set of scalloped cutters and my Williams-Sonoma Message Cookie Cutters.
 The message cutters are so fun to play with.
 Transfer wax paper to a sheet pan and chill until dough is very firm.
 When dough is firmly chilled, slide an offset spatula between the cookie dough and wax paper.
 Transfer cookies to a parchment or silicone lined sheet pan.
 After making several batches, I discovered I could speed the process along a bit faster if I chilled the cutouts in the freezer for about 5 minutes.

 And the partially frozen cutouts are easier to transfer to a prepared sheet pan for baking.
 Keep cutouts chilled until it's time to bake them. Before they go in the oven, sprinkle them with granulated sugar.
 If cutting round shapes, use a skewer or toothpick to poke a few decorative holes - this will help the cookies bake evenly. This step isn't necessary if you use the message cutters.
 Eat 'em plain.
